There is no official academic or technical paper titled "blender bpainter v20 rc4 new."
"BPainter" is a commercial add-on (software plugin) for the 3D creation suite Blender. "v20 RC4" refers to a specific version number (Version 2.0, Release Candidate 4). Because it is a commercial software tool, its documentation typically exists in the form of release notes, changelogs, and manual documentation rather than a research paper.
However, if you need a comprehensive overview or a written report on this specific release for your own records or study, I have compiled the details below based on the software's development history and typical feature set associated with the v2.0 update cycle.
BPainter v2.0 RC4 feels like the version the add-on always promised to be. It transforms Blender from a program that can texture paint into a program that is enjoyable to texture paint in.
If you are a Blender user who has been frustrated by the node spaghetti required to simply paint some dirt on a rock, or if you are coming from Substance Painter and miss the layer workflow, BPainter is essential.
Score: 8.5/10
For artists looking to stay entirely within the Blender pipeline without jumping to external apps for texturing, BPainter v2.0 is no longer a luxury—it’s becoming a necessity. Keep an eye out for the final stable release, but RC4 is already solid enough for production work.
In the neon-soaked world of 3D artistry, where every pixel counts, "Blender BPainter v20 RC4 New" is more than just a software update—it's the legendary "Red Brush" whispered about in digital corridors.
The story follows Elara, a texture artist working on a massive sci-fi epic. She's stuck; her current tools are sluggish, unable to handle the complex, multi-layered metal of a derelict starship. Then, she finds it: the RC4 release candidate. The Transformation:
As Elara installs BPainter v20, the interface feels like an extension of her hand. The new RC4 engine doesn't just paint; it flows. The Layer System:
No longer a tangled mess, the layers stack like thin sheets of glass, allowing her to adjust the rust on the starship’s hull without touching the underlying chrome. The Performance:
Where Blender used to stutter under heavy brushstrokes, the v20 RC4 glides. She watches in real-time as the "New" procedural brushes react to the ship's geometry, automatically gathering "dust" in the crevices and "wear" on the edges. The Midnight Breakthrough:
At 2 AM, the starship isn't just a model anymore. With the refined Color Picker and the lightning-fast Baking tools
of RC4, the hull looks battle-worn and ancient. She hits 'Render,' and the ship looks so real she can almost smell the burnt ozone and cold steel.
The "RC4" isn't just a version number to Elara; it’s the bridge between her imagination and the screen—the final piece of the puzzle that turned a flat gray shape into a piece of cinematic history. setting up BPainter in your current project?
Blender B-Painter v2.0 RC4: A Comprehensive Review
The world of 3D creation is abuzz with excitement as Blender, the popular open-source 3D creation software, has recently released a new version of its built-in texture painting tool, B-Painter. The latest iteration, B-Painter v2.0 RC4, promises to revolutionize the way artists and designers approach texture painting and sculpting. In this write-up, we'll dive into the new features, improvements, and capabilities of B-Painter v2.0 RC4. blender bpainter v20 rc4 new
Overview
B-Painter, short for BrushPainter, is a powerful texture painting and sculpting tool integrated within Blender. It allows artists to create high-quality textures and details on 3D models, making it an essential component of the Blender workflow. With the release of v2.0 RC4, the B-Painter team has focused on enhancing performance, usability, and feature set, making it an attractive option for both beginners and seasoned professionals.
New Features
Improvements
Capabilities
B-Painter v2.0 RC4 offers a wide range of capabilities that cater to various artistic and design needs:
Conclusion
Blender B-Painter v2.0 RC4 represents a significant milestone in the evolution of texture painting and sculpting within Blender. With its improved brush engine, enhanced UV mapping, and streamlined material and texture management, B-Painter v2.0 RC4 offers artists and designers an unparalleled level of creative control and flexibility. Whether you're a seasoned professional or just starting out, B-Painter v2.0 RC4 is an essential tool to explore.
System Requirements
To run B-Painter v2.0 RC4, ensure your system meets the following requirements:
Availability
B-Painter v2.0 RC4 is available for download within Blender 2.8 or later. Simply update your Blender installation to access the latest version of B-Painter.
Resources
For more information, tutorials, and documentation on B-Painter v2.0 RC4, visit the official Blender website or explore the Blender community forums.
BPainter v2.0 (specifically Version 2.0.0 RC4) is a significant update to the popular
add-on for Blender, designed to bridge the gap between Blender's native painting tools and professional software like Substance Painter or Photoshop. This release focuses on overhauling the layer-based workflow and improving performance for complex texture work. Core Feature Enhancements in v2.0 There is no official academic or technical paper
The v2.0 cycle, including RC4 (Release Candidate 4), introduces several critical changes to how Blender handles texture painting: Optimized Layer System
: The heart of BPainter v2.0 is its robust layer stack, which allows for non-destructive painting. Unlike standard Blender painting, v2.0 RC4 provides a more intuitive interface for managing masks and blending modes directly within the viewport. Universal Layer Types : RC4 refined support for various layer types, including: Paint Layers : Traditional pixel-based painting. Fill Layers : Allows for quick uniform color or pattern placement. Adjustment Layers : For real-time color correction and filtering. Performance Improvements
: RC4 was specifically optimized to reduce the lag often experienced when working with high-resolution textures (4K and above). This includes faster UI response times in the layers panel when multiple texture sets are active. Brush Management
: The new version features a more organized brush library, making it easier to save and recall custom brush settings across different projects. Workflow Changes
For users upgrading from older versions, RC4 introduces a more streamlined setup process: Material Setup
: BPainter v2.0 automatically handles the creation of complex node setups in the background, allowing artists to stay in the Texture Paint
workspace rather than manually connecting nodes in the Shading tab. Masking Capabilities
: RC4 improved the integration of image masks, allowing users to quickly toggle visibility or swap mask colors (Black/White) to hide or reveal specific texture data without losing original paint information. Automatic Backups
: To prevent data loss during long painting sessions—a common pain point in Blender—this version includes more stable background saving for texture assets. Installation and Updates If you are looking to install or update to RC4:
Ensure you are using a compatible Blender version (typically 3.x or 4.x depending on the specific RC4 build date). The add-on can be managed via the Get Extensions
menu in Blender's system preferences, where you can check for version-specific updates. with BPainter v2.0? Texture Paint Layers Free Addon Ucupaint - Blender
Here’s a detailed, structured review of Blender BPainter v20 RC4 (New) from an artist’s perspective.
Yes. If you rely on texture painting inside Blender, this is the most stable and feature-rich release in the last 18 months.
While the "RC" tag usually signals caution, this specific version (RC4) feels like a stable release. The bug reports from RC3 have been squashed, the UI is snappier, and the new brush manager alone is worth the update.
Download Link: (Search your favorite Blender marketplace or the developer's GitHub – ensure you grab the file labeled BPainter_v20_RC4_New to avoid legacy builds.)
Final Rating: 8.5/10 (Loses points only for the pending AMD driver fix; gains points for the incredible UI overhaul). Final Verdict BPainter v2
Have you tried BPainter v20 RC4 New? Share your experience or troubleshooting tips in the comments below. Happy painting!
Let’s be honest: BPainter is not a Substance Painter killer, but v20 RC4 closes the gap significantly.
| Feature | Substance Painter | BPainter v20 RC4 New | | :--- | :--- | :--- | | Price | $19.90/month | ~$30 (One-time) | | Layer Masks | Yes | Yes (Stable in RC4) | | Smart Materials | Extensive | Basic, but improving | | Export Channels | Unity/Unreal presets | Manual node setup | | Workflow Speed | Fast | Very Fast (New engine) |
The Verdict: For hobbyists and indie devs who don't want a subscription, BPainter v20 RC4 is the best alternative available inside Blender.
Release Candidates are pre-final builds meant to squash critical bugs. For BPainter v2.0 RC4, the focus was on:
Unleashing Power in 3D Texturing: Blender BPainter v2.0 RC4 The release of BPainter v2.0 RC4 (Release Candidate 4) marks a significant evolution for texture artists working within Blender. Originally developed by Andreas Esau, this add-on bridges the gap between Blender's native painting tools and professional layer-based workflows found in dedicated software like Photoshop or Substance Painter. Key Features of v2.0 RC4
This version refines the foundational "Paint Channels" system, allowing artists to manage complex PBR materials directly in the viewport without manual node setup.
Integrated Layer System: Provides an intuitive stack where you can add, delete, and merge layers. It supports various blend modes such as Overlay, Multiply, and Add.
PBR Paint Channels: Artists can paint across multiple material properties (Albedo, Roughness, Metallic) simultaneously within a single workflow.
Universal Brush Library: Brushes are stored globally, making them accessible across all your .blend files without the need for manual appending.
Automated UV & Texture Generation: When painting on an object without UVs, BPainter can automatically generate them upon creating a new layer.
Improved Color Management: Includes a custom color picker designed to sample the "real" color from the viewport by temporarily setting the shading to shadeless. Why Upgrade to the Latest RC?
The Release Candidate 4 focuses on stability and workflow optimization for recent Blender versions, such as Blender 2.81 and above. It addresses previous UI clutter by consolidating all essential painting tools into a streamlined end-panel tab.
Layer Masks & Adjustments: Advanced users can leverage mask layers and adjustment layers to create non-destructive effects.
Real-time Eevee Support: Handcrafted textures can be previewed instantly using Eevee’s PBR capabilities, ensuring what you see in the viewport is what you get in the final render. Getting Started
To install the latest version, users typically download the add-on from platforms like the Blender Market or BlenderNation Bazaar. BPainter Blender Addon - Layer Management
Since this is a Release Candidate, we are looking at bug fixes and refinements leading up to the stable launch.
Daimler
4 Startup of EWA Administration Tool
5 Starting, Stopping and Monitoring of EWA core services
6 EPC net / WIS net Database Maintenance
6.1 Influence the installed Database status
6.6 Applying Daily Updates for WIS net Database
6.6.1 Configuration and Manual Run
6.6.2 Running Daily Imports Scheduled
6.7 Wiping all Database Content
7 Advanced Command line options
7.2 Update (Database and Software)
This document describes the EWA Admin Tool Interface of EWA net which is used to update, manage and maintain the WIS and EPC Databases as well as managing the state of the server.
Besides the software installation, the applications need to have access to certain databases for content data. This content is not installed within the setup of the software but needs to be updated after installation. The aim of this behavior is to decouple software and data update and minimize the downtime of the applications.
This document describes the use and function of the EWA Admin Tool. The following use cases are documented in this description:
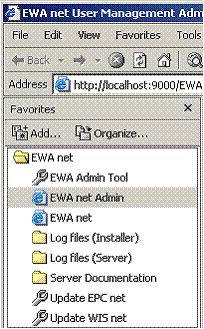
The EWA net Administration tool can be started using the favorites menu inside the Internet Explorer. This entry is created during installation and is only available on the server.
Picture 1: Start of EWA net Administration tool using the favorites menu
The EWA net Administration tool can be only started on the EWA net server. If the link to this tool is not available, it can be started manually using the command
[EWA_HOME]\ewa_admin\EWAAdmin.exe
where EWA_HOME need to be replaced with the directory where EWA net was installed.
With the EWA Administration Tool it is possible to influence the availability of the server and see if it is running. The Administration tool acts as a service monitor and shows if the needed Windows services are running or not.
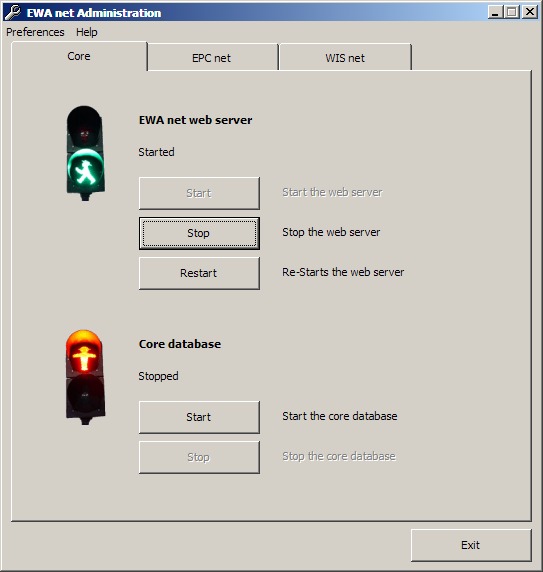
Picture 2: Service Monitor Page for the Server
Within this panel the EWA net server (application server) can be started and stopped. This is more or less a shortcut for the Windows “Services” view.
Also within this panel the user management database (i.e. for specific user data, FIN Cache,…) can be started and stopped.
Note:
Database “start” and “stop” is not simply starting and stopping services. A “stop” always also stops the corresponding TransBase multiplexer service. And “start” always starts both the database engine and the TransBase multiplexer service.
If the services are stopped the application server will not be available for all users. Please take this into account when starting or stopping services.
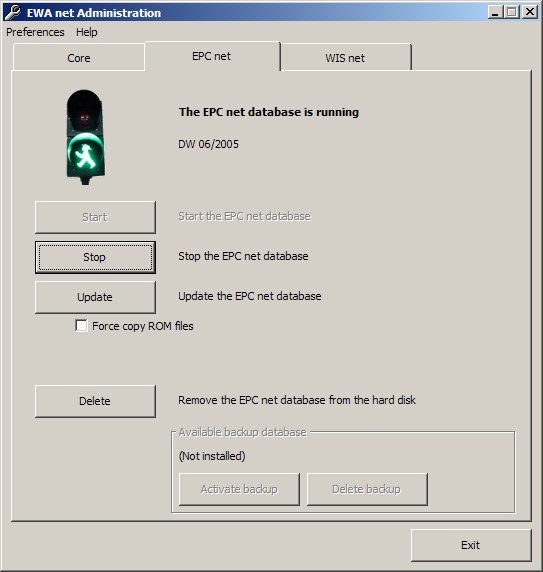
The databases of WIS net and EPC net are maintained in a very similar way. Since there is no difference except the starting tab on the dialog, both parts will be described in a single chapter
On the EPC net / WIS net Screen in the Administration Tool it is possible to see the current state of the running database. If no database is installed, the traffic light will be off. If the database itself is working and the database service shows a good status, it will show a green traffic light. Else the traffic light will show a red status.
Use the “Start” and “Stop” Buttons to shutdown / start the database and the Transbase service.
Note:
Database “start” and “stop” is not simply starting and stopping services. A “stop” always also stops the corresponding TransBase multiplexer service. And “start” always starts both the database engine and the TransBase multiplexer service.
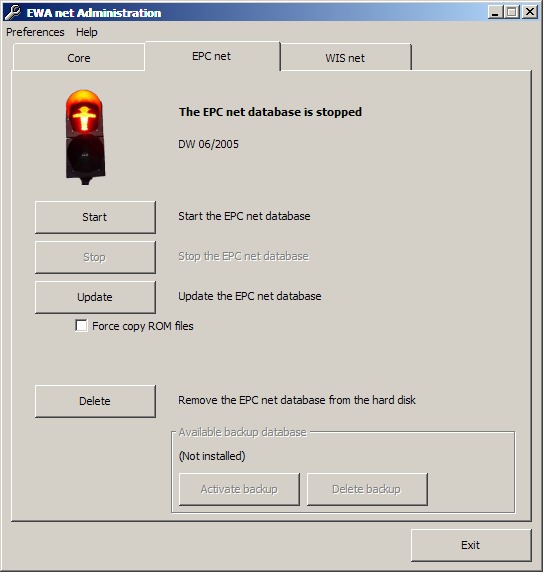
Picture 3: EPC net Administration of Database
Note:
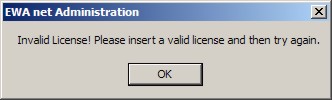
EPC net / WIS net database installation requires a valid Start Key entered in the admin interface of EWA net. You can go to the interface either by selecting “EWA net Admin” from your Favorites “EWA net” folder or directly by its URL http://localhost:9000/EWA-net/Admin. An explanation for entering a StartKey is provided in your Admin Guide.
To install a new database into the running application, use the “Install” button. This will start the process of copying the needed database files from DVD to hard disk and attach the databases to the running service. Once a database is installed, the button will be labeled as "Update" to indicate that this action will update the running database.
After the button is pressed, the tool will ask you to insert an EPC net / WIS net data DVD to any DVD drive of your machine. For EpC net it will try to read the “FDARequest.cfg” file which is normally in the folder “MBXX\cfg” of any data DVD. For WIS net the program tries to find the "WISCD000" file in the folder "wis" of the DVD root.
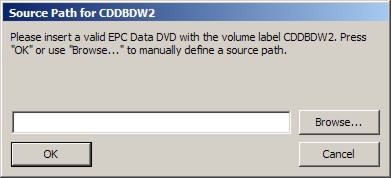
Picture 4: Admin tool requests the data DVD configuration file
If the DVD is inserted just press “OK” - the Tool will search all available drives in PC for the configuration file. If you already had a valid data DVD of EPC net in one of your DVD drives, the tool will have skipped this dialog and started installation immediately.
Note:
If the files should be installed using a network share, use the “Browse…” button and navigate to the corresponding folder on the network share and select the “FDARequest.cfg”/"WISCD000" file in the folder “MBXX\cfg”/"wis" relative from the DVD root.
The Tool will also search all hard drives and mounted Shares for data DVDs.
After the configuration file has been read successfully and the database files could be found, the tool will request to select a target drive for the database content. Select one or more drives where all database files should be copied to and click “OK”. The dialog will also show how much space is required on the destination drive.
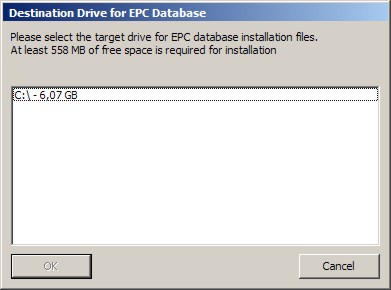
Picture 5: Selection of the target drive for database content
The next step in the copy process is to start to copy the ROM files to hard disk. If the source DVD can not be located in any drive of the PC, the Tool will ask for a source for copying the files.
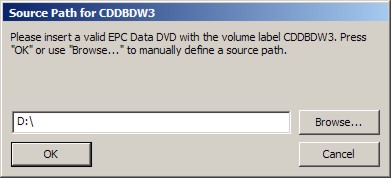
Picture 6: Selection of ROM file source
In this dialog, please select the DVD root directory when the tool requests a file. The path inside the media is searched automatically. If a network share is used as file source, please point to the folder which corresponds to the original DVD root.
The copy process will be visualized with a progress. Please wait until all data has been copied or the Tool asks you for further media.
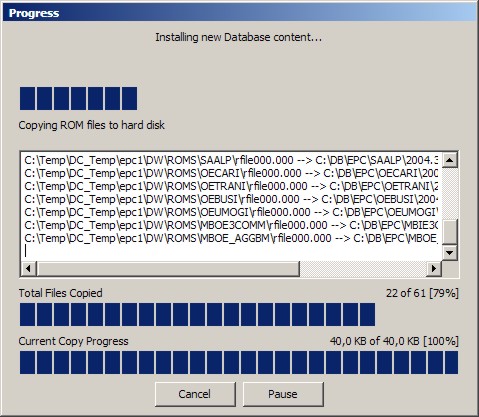
Picture 7: Copy Progress Dialog
After all database ROM files have been copied, the tool will proceed with the following steps:
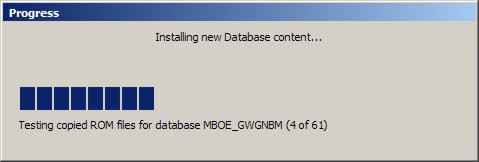
Picture 8: Database test Dialog
After these steps have been completed successfully, it will show a notification that all needed databases have been copied and activated successfully. The traffic light for the EPC net / WIS net database status will turn to green now.
Picture 9: Successful installation of a database
The update of database content will almost use the same installation process like the initial installation of the database.
The difference in the update step is that you are requested to insert the DVD which contains the setup into any DVD drive. During update the normal setup will be called to update software resources. Please select the appropriate folder where the setup.exe is available if the files could not be found automatically.
Note:
When updating the server, you should ensure that no user is using the applications. Users can continue working while database ROM files are being copied to the hard disk. But after finish of this process the server will be shutdown so users might lose important data.
Database can easily be deleted from the system by clicking on the “Delete” button. This button will delete the currently active database.
Note:
Be sure that you notify all users to save important data and to log off from the system as they might loose data when the database will be deleted.
When a database set was updated, the older version will be kept as backup database. With the activate database button it is possible to switch the backup and the active database. The former active database will be kept as backup.
Note:
Be sure that you notify all users to save important data and to log off from the system as they might loose data when switching the database.
The WIS net database provides the ability to apply incremental daily updates.
Note:
To use this functionality you need additional files which are supplied via ManageSoft. This is only available if you use the online update mechanism. Additionally your access authorization need to enable this feature in the application.
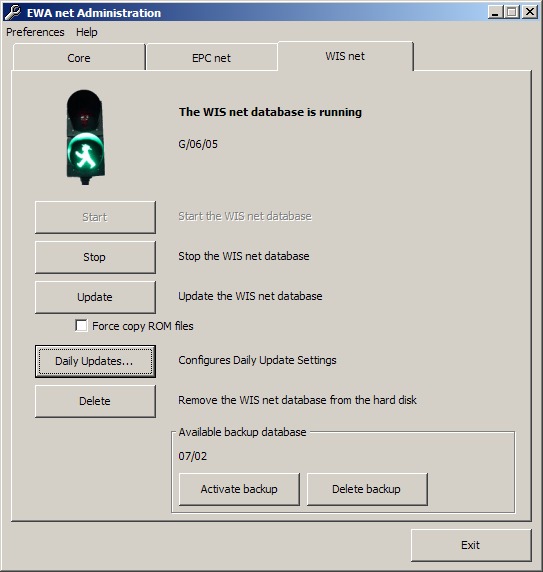
Picture 10: Start Dialog to configure WIS net Daily Updates
Click on the "Daily Updates..." button to configure the settings for daily updates in WIS net. A dialog will appear and give you additional configuration options. If this button is disabled, the database is not active or the access authorization does not permit the use of daily update data.
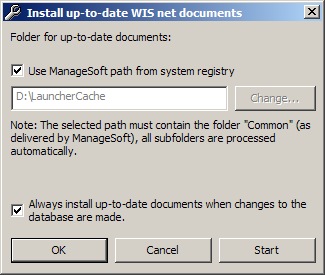
Picture 11: Configuration Dialog for Daily Update settings
This dialog provides the following options:
Note:
The configuration for daily updates in Admin Tool does not automatically enable a daily based import of the data. Please take a look to the following chapter how to enable a schedules import by using the Windows Task Scheduler.
To run daily imports you need to schedule a job in the Windows Task Scheduler which automatically applies the newest received data to the database. You need to configure manually a Task for running the import (i.e. via
Start →Programs → Accessories → System Tools → Scheduled Tasks.
The executed task needs to run in the folder [EWA_HOME]\wis_case_online_importer.
The executed command is: bin\run_mimport.bat <path> <language>
<path>: Specifies the path (folder) where the import files are located.
<language>: Language code to import to database. the following language codes are supported:
| Language Code | Language |
|---|---|
| d | German |
| e | English |
| f | French |
| i | Italian |
| ndl | Dutch |
| s | Spanish |
Example Call: bin\run_mimport.bat C:\LauncherCache\Common\Daily-update_WISnetDocuments_DE d
Notes:
- If you want to import multiple languages, you need to run the script for each of the languages.
- You cannot call the script with arguments in Windows Scheduled Tasks. Therefore the best is to write your own small script which calls the importer for you. Then simply make this script part of your scheduled tasks.
Sample Windows script importing the German and English documentation updates which you may use as a template for own scripts - simply store it anywhere on your disk and make this a scheduled task. The parameters you have to change according to your local installation have been highlighted. Basically you have to configure the correct EWA net installation folder and the directory where your update packages for the daily updates have been stored.
@echo off
cd "C:\Program Files\EWA net\wis_case_online_importer"
bin\run_mimport.bat "C:\LauncherCache\Common\Daily-update_WISnetDocuments_DE" d
bin\run_mimport.bat "C:\LauncherCache\Common\Daily-update_WISnetDocuments_EN" e
To wipe out all existing database files for both WIS net and EPC net it is possible to run the EWA Administration tool in a special mode. This mode will remove all installed instances of WIS net / EPC net databases and their metadata.
To clean all databases and all metadata of installed databases run the program and go to the screen of the corresponding application. Hold down the "Ctrl" key which pressing on the "Delete" button of the screen. You need to confirm the question and then all files will be removed.
This chapter is mainly intended for System Integrators who want to make use of the batch mode of the Admin Tool to allow further customizing of the installation update process, one may want to make use of the command line features of the EWA Admin Tool.
Note:
EWA Admin Tool has been developed for the “local” environment where all software components will be installed on one single server. In a distributed environment like the “central” not all of the features described here will work.
To get an overview of the available options, just issue the following command on a command line:
“C:\Program Files\EWA net\ewa_admin\EWAAdmin” /?
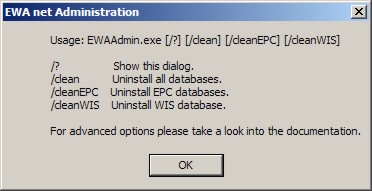
Picture 18: Help to get Usage Hints for EWA Administration Tool
This overview will not capture all options. Further options will be available here in the documentation
Admin Tool allows starting and shutting down the Transbase databases individually without the need of knowledge about the special characteristics behind it. There are currently 3 databases that can be controlled:
The command line is quite easy. You specify which database you want to operate on and which operation you would like to perform: shutdown or boot. The command line for this is:
EWAAdmin.exe [/core | /wis | /epc] [/boot | /shutdown]
Description:
|
Parameter |
Description |
|---|---|
| /core |
Operate on the EWA user management database |
| /wis |
Operate on the WIS net database |
| /epc |
Operate on the EPC net database |
| /boot |
Boot the specified database |
| /shutdown |
Shutdown the database. This will also invalidate any open connection without reconfirmation. |
Example call:
EWAAdmin /wis /shutdown
will shutdown the WIS net database.
Note:
When shutting down databases in most cases it may also make sense to shutdown the application server, too. After doing your maintenance be sure to boot the application server again.
There is no command line in EWAAdmin.exe as this can easily be achieved by issuing the command lines
net stop “EWA net Server”
to stop the application server or
net start “EWA net Server”
to start the application server again. This command must be issued on the server machine where the EWA net application server is running of course.
If you want to start an update without the user being forced to start Admin Tool and click some buttons you can easily start the update process from the command line. Simply select the application part you would like to operate on (WIS net or EPC net). Admin Tool will then automatically start the update process for the regarding application.
The command line looks like this:
EWAAdmin.exe [/wis | /epc] [/license licensebits] [/force] [/source Path] [/target Drive]* [/exclude Drive]* [/nofork] [/noswupdate] [/unattended] [/v]
Description:
|
Parameter |
Description |
|---|---|
| /epc |
Update EPC net |
| /wis |
Update WIS net |
| /license |
Optional: Note: You cannot provide a crypted StartKey here |
| /force |
Optional: |
| /source Path | Optional: Defines the source path from where to find and copy the database files. Te source parameter can be specified multiple times if multiple source directories are required. Besides the specified source paths the program always searched all available drives for the needed files if the file can not be found in the defined source path. |
| /target Drive |
Optional: |
|
/nospacecheck | Optional: Flag to specify whether the free space check on the target drive should be omitted. If specified, the program will not check for sufficient free space on target drive. |
| /nobuffertune | Optional: Flags the instance to skip Windows buffering optimizations. In rare cases the file copy speed breaks down during the update process to a few KB/s instead of several MB/s. Initially the program has been optimized to allow fast copy performance without impact of running server. If the file copy of the database media is very slow, this command line option can try to skip the optimizations. Do not use this option if the program is copying in a reasonable speed. |
| /exclude Drive |
Optional: You can repeat this option to specify multiple drives |
| /nofork | Optional: In a normal call the program copies itself to %TEMP% and executes there. If the process should be watched, this parameter can be used to prohibit the copy of the application to %TEMP%. Note: When using this option the integrated software update will fail. In this case please call the software update manually! |
| /noswupdate | Optional: Enforces the program to skip consistency checks and does not run software update during database update.
Note: When using this option you have the possibility to skip a software update when installing new database content. Nevertheless is it highly recommended that you always update the software together with the database update. If you decide to de-couple the software and database installation processes this is fine - but do not forget to update the software, too. |
| /unattended | Optional: Suppresses confirmation dialogs and allows batch execution of the program |
| /v | Optional: Enables debug logging for troubleshooting (verbose mode) |
Note:
When specifying parameters containing special characters like "-" or "/" please quote those parameters.
Example:
Use
EWAAdmin.exe /source "C:\EWA-net"
instead of
EWAAdmin.exe /source C:\EWA-net
The latter one will fail as the commandline parser will think there is another parameter hidden on the commandline.
You can remove any installed databases from the system by the command line, too.
The command line looks like this:
EWAAdmin.exe [/clean | /cleanwis | /cleanepc]
Description:
|
Parameter |
Description |
|---|---|
| /clean |
Removes all (EPC net AND WIS net) databases |
| /cleanwis |
Removes the WIS net database(s) |
| /cleanepc |
Removes the EPC net database(s) |
When using the update database options in the Administration tool a process is executed which handles the database update. The following steps are processed during a database update:
If the update can proceed using a integrated update (when no major software changes are required) the application server will be down between Step 13 and Step 23. This downtime will be usually around 5 minutes. If the update check in step 4 detects that a longer downtime is required, the application will be unavailable from step 4 until step 23.
If the EWA Administration tool is not working, please use the following steps to determine why the application is not working: